Want to make a statement wall in a room, but not sure what route to take? Just painting one wall in a room a different color only makes for a soft statement. You know me, I don't do soft. So why not make a BOLD statement and put a stencil on it?!
I will admit that this project was by far the most difficult one yet. Let me explain...so I cleverly decided 2 days before Rhemi's birthday party last year to start this project. You know, so the house would look all "pretty,pretty" (as Hot Mess says). Yea, big mistake! Not only did I have all the millions of things to do for the party, clean the house, etc,etc,etc. I added 2 sleepless nights to that list with this project!
Too much to do, too little time!
The project could have been way less stressful & less difficult if not for the party deadline. So don't let that detail scare you from doing this. I admit it was a little tedious, but way worth it in the end!
Like I said, I wanted a BOLD statement.
Here are a few other ways of going about it:
Here are a few other ways of going about it:
~You can easily do a monochromatic color that blends nicely with existing color
~Get the same color of the existing room,but get it in high gloss so the sheen of the pattern makes the statement
~One shade lighter of the existing paint color
~One shade darker of the existing paint color
~Use metallic paint. Metallic paints come in many different color variations. They also have very soft neutral colors like pearl if you would prefer it doesn't look like a bike reflector when you walk in the room.
You can find the stencil I used & many more here:

First things first. Prep & prime your wall.
I used ALOT of painter's tape for this project. The stencil I got measure approx. 2'x3'. Every time you move the stencil for the next section you have to make sure it is securely on the wall with tape. You do not want any wrinkles in the stencil while painting. It will then lead to your paint going outside of the lines & adds for some extra touching up in the end. Save yourself some trouble & make sure you tape it down well for each application! Tedious, but saves time!
I used a small sponge roller I got from the paint store. It specified it was for a fine application. I would not recommend a cheapo roller from an art & crafts store. You could use a fine paint brush for application, but seems like more work to me. I just used a fine brush for my touch ups.
You do not have to let the paint dry before you remove the stencil for the next section. After I was done painting each section, I slowly removed the stencil, placed it down on top my drop cloth to let the paint dry on the wall & the stencil. This gave me time to touch up the painted pattern section on the wall. By the time I was done touching up, the painted section & stencil were dry enough to move onto the next application.

Here is how it should look when secured to the wall. I did this project a year ago before my blog. Sorry, I don't have step by step illustrations from mine :(

Rolling & carefully taking it off the wall. Check out that roller sponge!

Here's my work in progress.
REPEAT. REPEAT. REPEAT.

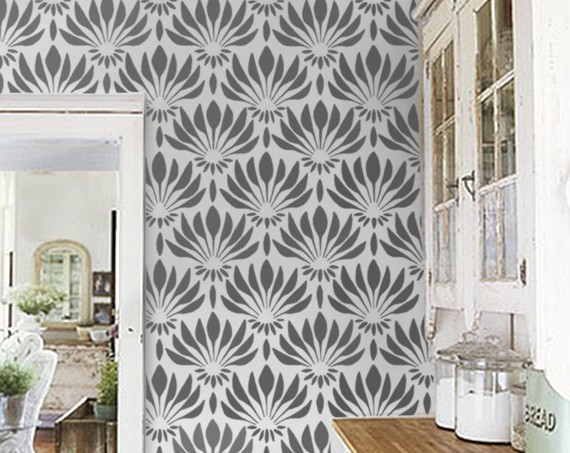
All done and ready to enjoy!
Here are some other great stencils that are found on the same site I got mine!


Wanna step outside the box a little?


{A must do in my next house!}

Love the stencil concept, but don't want it so permanent? Here's one for you!

Here is another source I came across for some "pretty, pretty" stencils!
http://www.cuttingedgestencils.com/
http://www.cuttingedgestencils.com/


